Crochet is a timeless craft that allows you to create stunning, intricate designs with simple materials. Among the many styles and patterns in the crochet world, the Crochet Granny Rectangle – Pattern stands out as a versatile and beautiful option for crafters of all skill levels. Whether you’re a beginner or an experienced crocheter, learning how to create a granny rectangle is an essential skill that opens up countless possibilities for your projects. In this article, we will guide you through everything you need to know to master the Crochet Granny Rectangle – Pattern and incorporate it into your crochet projects.
The Granny Rectangle offers a unique twist on the classic granny square, allowing you to create long, rectangular pieces that are perfect for a variety of projects. This pattern is often used for blankets, shawls, bags, and even home décor items. The key to mastering the Crochet Granny Rectangle – Pattern lies in understanding its structure and how to adjust the number of rows and stitches to achieve your desired size and shape. With the right technique and patience, you can create beautiful, functional pieces that showcase your crochet skills.
To begin, it’s important to understand the basic elements of the Crochet Granny Rectangle – Pattern. This pattern is typically worked in rounds, where each round adds more width and height to the rectangle. The beauty of the granny rectangle lies in its versatility—you can experiment with color changes, stitch types, and sizes to create a piece that fits your personal style. Additionally, this pattern is beginner-friendly, as it uses simple stitches like double crochet and chain stitches, making it a great entry point into the world of crochet.
1. Understanding the Basics of the Crochet Granny Rectangle – Pattern
Before diving into the specifics of the Crochet Granny Rectangle – Pattern, it’s important to understand the basic construction. The pattern usually starts with a foundation chain, which forms the first row of your rectangle. From there, you work in a repetitive stitch pattern, typically involving double crochet, chain spaces, and sometimes slip stitches. The key to achieving the perfect granny rectangle is maintaining consistent stitch tension, which will give your project a neat and even appearance.
DISCOVER MORE FREE PATTERNS HERE!
To begin your Granny Rectangle, start by creating a foundation chain that matches the width you want for your finished piece. Typically, the foundation chain is an odd number, as this allows for even stitch placement. Once your foundation chain is complete, you’ll begin working in rows, turning your work after each row to build the length of your rectangle.
As you continue with the Crochet Granny Rectangle – Pattern, you’ll notice that the pattern grows outward from the center, with each new round expanding the rectangle’s size. The key to this pattern’s success lies in the number of stitches added per round, as this determines the overall shape and size of your rectangle. Be sure to follow the pattern carefully, adjusting the number of stitches as needed to achieve the desired measurements.
2. Choosing the Right Yarn and Hook Size for Your Crochet Granny Rectangle
The choice of yarn and hook size plays a significant role in the final look and feel of your Crochet Granny Rectangle – Pattern. Yarn comes in various thicknesses, or “weights,” ranging from lace weight to bulky yarn. For most granny rectangles, a medium-weight yarn (such as worsted weight) is an excellent choice because it offers a good balance of texture and durability.
When selecting your yarn, consider the fiber content as well. Acrylic yarn is often a popular choice for beginners due to its affordability, variety of colors, and easy care. However, cotton yarn or wool may also be ideal choices for different projects, particularly if you are aiming for a more luxurious feel or if you want to create a more structured rectangle.
In terms of hook size, it’s important to match the size of the hook with the thickness of your yarn. For worsted weight yarn, a 5mm (H-8) crochet hook is typically recommended. However, it’s always a good idea to crochet a swatch before starting your project to ensure the yarn and hook combination works well together, and that your stitches are the right size.
3. Step-by-Step Guide to Creating the Crochet Granny Rectangle – Pattern
Now that you understand the basics of the Crochet Granny Rectangle – Pattern, let’s walk through the steps to create your own granny rectangle. Here is a simple step-by-step guide to get you started:
- Foundation Chain: Begin by creating a foundation chain of your desired width. Make sure the chain is an odd number for proper stitch placement. The number of chains will depend on the size of the rectangle you want to create.
- Row 1: Work a series of double crochet stitches into the foundation chain. After the first row is complete, turn your work.
- Subsequent Rows: Continue working in double crochet stitches, making sure to add chain spaces at the appropriate intervals to allow for the expansion of the rectangle. Be sure to turn your work at the end of each row.
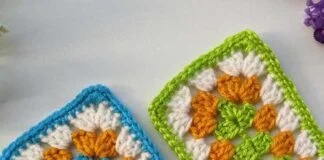
- Color Changes: To add a unique touch to your rectangle, experiment with color changes. You can change colors at the beginning of each row or every few rows to create a striped effect.
- Finishing: Once you’ve reached your desired length, fasten off your yarn and weave in any loose ends to complete your granny rectangle.
With these simple steps, you can create a beautiful Crochet Granny Rectangle – Pattern that can be used for a variety of projects, from blankets to bags to home décor items.
4. Common Mistakes to Avoid When Crocheting a Granny Rectangle
While crocheting a granny rectangle is relatively simple, beginners may encounter a few common mistakes. Here are some tips on how to avoid these pitfalls:
- Inconsistent Tension: One of the most common mistakes when crocheting a granny rectangle is inconsistent stitch tension. This can result in a rectangle that is uneven or has a distorted shape. To prevent this, practice maintaining consistent tension throughout your project.
- Too Tight or Too Loose Stitches: If your stitches are too tight, it can make your rectangle difficult to work with, and if they’re too loose, your rectangle may lack structure. Be sure to crochet with a comfortable tension that allows the stitches to flow naturally.
- Not Following the Pattern: It’s easy to get caught up in the excitement of crocheting, but it’s important to follow the pattern carefully. Skipping steps or adding extra stitches can affect the size and shape of your granny rectangle.
- Skipping the Turning Chains: Turning chains are essential when crocheting in rows, as they help maintain the proper stitch height. Be sure to include a turning chain at the beginning of each row to ensure the proper stitch alignment.
- Not Swatching First: Before starting your main project, it’s always a good idea to crochet a small swatch to test your yarn, hook size, and tension. This ensures that your rectangle will turn out as expected.
- Not Checking for Mistakes: Regularly check your work as you go along. It’s easier to fix mistakes early on rather than waiting until you’ve completed several rows.
FAQ
1. What is a crochet granny rectangle?
A crochet granny rectangle is a variation of the traditional granny square. It is made in rows, creating a rectangular shape rather than a square, and it’s often used for blankets, shawls, and other projects.
2. Can I use any yarn for a granny rectangle?
Yes, you can use a variety of yarns, but it’s recommended to choose yarn that works well with your hook size and provides a comfortable texture for your project. Medium-weight yarn is the most common choice.
3. How do I change colors in a granny rectangle?
To change colors, simply finish the last stitch of your current color, and before pulling through the final loop, introduce the new color. Continue with the new color for the next row.
4. How do I make my crochet granny rectangle larger?
To make your granny rectangle larger, simply add more rows using the same stitch pattern. Adjust the number of stitches per row to achieve the desired width and length.
5. Can I use a granny rectangle for a blanket?
Yes, a granny rectangle is perfect for creating a crochet blanket. You can connect multiple rectangles together to form a larger, cohesive piece.
6. What should I do if my crochet rectangle is uneven?
If your rectangle is uneven, check your tension and stitch count. Adjust your stitches and ensure that you are turning your work properly at the end of each row.
Conclusion
In this article, we’ve explored everything you need to know about the Crochet Granny Rectangle – Pattern. From understanding the basics and choosing the right materials to following a step-by-step guide, you now have the tools to create beautiful granny rectangles for any project. Don’t forget to experiment with colors and designs to make your pieces truly unique. We hope you found this guide helpful! Feel free to leave a sincere opinion and any suggestions you have to improve this article or share your experiences with the Crochet Granny Rectangle – Pattern. Happy crocheting!