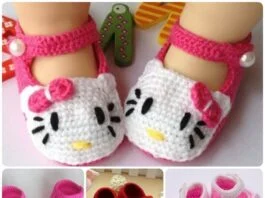
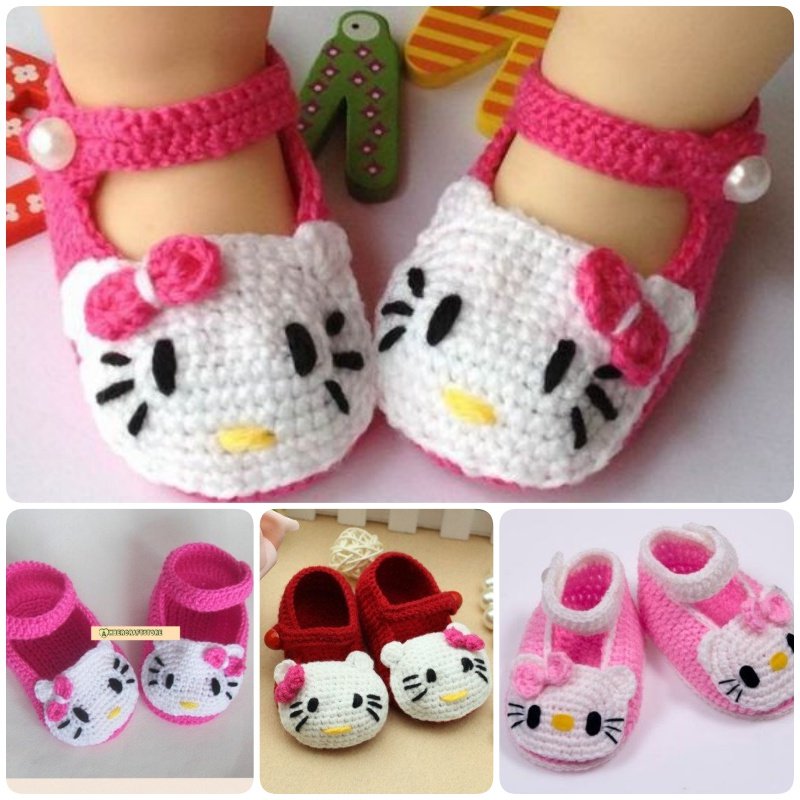
Crochet is a wonderful way to create thoughtful, personal gifts for loved ones, and there’s no better way to combine practicality with cuteness than by crocheting a pair of Hello Kitty Booties. These adorable little shoes are perfect for babies or toddlers, and they make a great gift for baby showers, birthdays, or just because. The Hello Kitty Booties Crochet Pattern is a fun and easy project that combines the timeless charm of Hello Kitty with the comfort of soft, cozy booties.
Whether you’re a beginner crocheter or someone with more experience, these booties are a great way to practice your crochet skills while creating something utterly cute. In this guide, we’ll walk you through each step of creating your own Hello Kitty Booties, provide helpful tips along the way, and show you how to add those signature Hello Kitty details that make these booties so special.
Advertising
Get ready to bring a little extra cheer into your crochet projects! Let’s begin the journey to creating the most adorable pair of Hello Kitty Booties!
1. Materials You’ll Need for Crochet Hello Kitty Booties
Before starting your Crochet Hello Kitty Booties, gather the materials you’ll need to ensure a smooth crafting experience. Here’s a list of supplies you’ll need:
- Yarn: Choose a soft yarn that’s gentle on baby skin, such as cotton or a soft acrylic blend. For the booties themselves, white or a light pastel color works best to mimic Hello Kitty’s traditional look. You’ll also need black, yellow, and pink yarn for the facial features.
- Crochet Hook: A 3.5mm (E-4) or 4mm (G-6) crochet hook is ideal for this project, especially if you’re using a medium-weight yarn.
- Yarn Needle: A yarn needle will be necessary to weave in the ends once you’ve finished crocheting the booties.
- Scissors: You’ll need a good pair of scissors to trim your yarn after each round and color change.
- Safety Eyes or Black Yarn: For the eyes of Hello Kitty, you can use safety eyes (available at craft stores) or crochet the eyes using black yarn.
- Stuffing: You may want to use some soft fiberfill to lightly stuff the booties, giving them a soft and rounded shape.
- Pink and Yellow Yarn (for the bow): You’ll need pink yarn for the bow that adorns Hello Kitty’s head, as well as yellow yarn for her nose.
2. How to Crochet the Hello Kitty Booties – Step-by-Step
Creating your Hello Kitty Booties is a straightforward crochet project, but it does require some attention to detail to ensure the booties come out looking just right. Below is a simple step-by-step guide to help you crochet your own adorable Hello Kitty-inspired footwear.
2.1. Crocheting the Booties Base
- Start the Sole: Begin by crocheting a small circle for the sole of the booties. You’ll want to start with a magic ring (or chain 4 and join to form a ring). From here, crochet several rounds of single crochet to form a flat, circular sole. Increase the number of stitches in each round to ensure the sole is large enough to fit the baby’s foot.
- Work Up the Sides: Once the sole is the right size, continue crocheting in a spiral to form the sides of the booties. You’ll need to use basic single crochet stitches for this portion. The sides should rise up gradually, shaping the bootie to fit the foot.
- Create the Heel: When you’ve reached the height you want for the booties, work a few more rounds to form the heel. You can adjust the height here depending on whether you want the bootie to be ankle-high or higher up on the foot.
- Finish the Bootie Opening: To finish the opening of the bootie, crochet a few rounds of single crochet or slip stitch to create a neat, even edge.
2.2. Adding Hello Kitty’s Face and Features
- Add the Eyes: For Hello Kitty’s eyes, you can either sew on safety eyes or crochet small circles of black yarn and sew them onto the booties. If you’re crocheting the eyes, chain 2, make 4 single crochets into the second chain from the hook, and then slip stitch to close. Attach the eyes in a way that fits the Hello Kitty design—close together near the top of the bootie.
- Crochet the Nose: For Hello Kitty’s signature yellow nose, crochet a small circle in yellow yarn. Chain 2, make 6 single crochets into the second chain from the hook, and then slip stitch to close. Attach the yellow nose in the center of the face, slightly below the eyes.
- Embroider the Whiskers: Use black yarn to embroider three whiskers on each side of Hello Kitty’s face. Make them small and delicate, ensuring they’re positioned symmetrically on either side of her nose.
- Add the Bow: Hello Kitty’s iconic pink bow can be made by crocheting a small rectangle of pink yarn and folding it into a bow shape. Use a small piece of yarn to tie the center of the bow together, then sew it onto the top of the bootie, near the top of the “head” portion.
2.3. Assembling the Booties
- Sew the Features on the Booties: Once you’ve crocheted the facial features and bow, carefully sew them onto the booties using a yarn needle. Make sure the face is centered, and the bow is securely attached to one side of the bootie.
- Finish the Second Bootie: Repeat the entire process for the second bootie. It’s important to ensure both booties are even in size and appearance, so double-check your stitches and positioning of the facial features.
2.4. Final Touches
- Stuff the Booties: If you want the booties to have a bit more structure, lightly stuff them with fiberfill. This will give them a fuller shape and make them more comfortable for the little one wearing them.
- Weave in Ends: Use your yarn needle to weave in any loose yarn ends to ensure a clean finish. This will prevent the yarn from unraveling over time.
- Block (Optional): If needed, you can lightly block the booties to ensure they hold their shape and size.
3. Customizing Your Crochet Hello Kitty Booties
Once you’ve mastered the basic Hello Kitty Booties pattern, you can personalize them and try different variations. Here are some ideas to help you customize your booties:
- Different Color Combinations: While Hello Kitty is traditionally white, you can create a fun variation by changing the color of the booties or bow. Try using pastel shades, or make the booties in a bright, bold color to suit the recipient’s style.
- Add Ribbons or Pom-Poms: For extra flair, you can sew on ribbons or tiny pom-poms to the booties. These little additions can make the booties even cuter and more unique.
- Crochet a Matching Hat: Create a matching Hello Kitty-inspired crochet hat or headband to complete the outfit. You can use the same face details and bow from the booties to tie the look together.
- Change the Bow Style: Experiment with different styles for Hello Kitty’s bow, such as a larger bow, a multi-colored bow, or even a crocheted flower to give your booties a unique twist.
- Add a Sole Lining: For a more durable pair of booties, consider adding a fabric lining inside the sole. This will help the booties last longer and provide extra comfort.
4. Creative Uses for Crochet Hello Kitty Booties
While the Hello Kitty Booties are perfect for little ones, there are other creative uses for these cute crochet creations:
- Baby Shower Gift: These booties make a perfect handmade gift for a baby shower. Pair them with a matching crochet hat or blanket for a thoughtful and personalized gift set.
- Birthday Gift: Hello Kitty is beloved by children of all ages, so these booties would make a sweet birthday present for any little fan of the character.
- Home Décor: Create several pairs of Hello Kitty booties and turn them into adorable décor items for a nursery or playroom. You could hang them up on a decorative mobile or place them on a shelf as a cute display.
- Party Favors: If you’re throwing a Hello Kitty-themed party, these booties would make a charming and unique party favor for guests.
- Photography Prop: These booties make for an adorable addition to baby photoshoots. They’ll add a playful touch to any photo and make for memorable keepsakes.
FAQ
1. Can I make these booties for older children or adults?
While this pattern is designed for babies and toddlers, you can adjust the size by using thicker yarn or a larger hook to make the booties bigger for older children or even adults.
2. How long does it take to crochet Hello Kitty Booties?
On average, it takes around 2-3 hours to complete a pair of Hello Kitty Booties, depending on your skill level and how intricate you want the details to be.
3. Can I use a different character for the booties?
Absolutely! You can adapt the pattern to create booties inspired by other characters. Simply change the facial features and bow to match the desired character.
4. How do I make sure the booties fit the baby’s feet?
To ensure a perfect fit, measure the baby’s feet before starting and adjust the number of stitches for the sole and the height of the booties accordingly. You can also try the booties on a baby doll if you’re unsure.
5. What yarn is best for baby booties?
Soft, baby-friendly yarns like cotton or acrylic blends are ideal for baby booties. These yarns are gentle on sensitive skin and easy to care for.
**6. Can I
make the Hello Kitty Booties without the facial details?**
Yes! If you prefer a more subtle look, you can skip the face details and just crochet the booties in the desired color with the bow. They’ll still be cute and stylish.
Conclusion
Crocheting Hello Kitty Booties is a rewarding and fun project that lets you create something both practical and adorable. With a little time and creativity, you’ll have a pair of booties that are perfect for any baby or toddler, and they’ll surely bring smiles to anyone who sees them. We hope this pattern helps you create the cutest booties for your next crochet project!
We’d love to hear how your Hello Kitty Booties turn out. Let us know in the comments, and feel free to share any tips or suggestions for customizing the pattern!